- Home
- Knowledge library
- Dairy cow milking: milking routines
Dairy cow milking: milking routines
A good milking routine in a clean environment will help reduce the risk of mastitis spread in your herd. Read our recommendations for milking routine best practices.
The aim of a good milking routine
A good milking routine is critical to producing high-quality milk. If you get it right, cows will milk faster and give more milk, you’ll have better milk quality, and you should see less mastitis.
The aim of a good milking routine is to put the teat cups on calm cows with clean, dry, well-stimulated teats, to remove milk rapidly, and to remove the teat cups as soon as the cow has finished milking.
Below, we look at best practices to help you achieve a milking routine that works well for you and your cows.
Pre-milking procedures
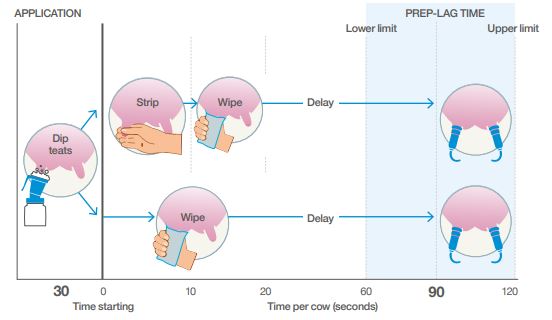
Aim for a prep-lag time of between 60 and 120 seconds between first stimulating the teats and attaching the units. This synchronises milking out the alveolar milk (high up in the udder tissue) with the cisternal milk (in the udder just above the teat), and cows will milk out cleaner and faster. This reduces the risk of stop-start milking (bimodal or biphasic milking) and reduces new infection risks, as well as being nicer for the cow.
In long parlours, it’s not possible to prepare all cows in the row and still achieve this. Check how many cows can be prepared with your teat-preparation system and then return to attach the units within 60 to 120 seconds. It will vary depending on the size of your parlour and the details of your cow preparation.
Two-step process
Dip and strip
- Contact time – the length of time the pre-dip has been in contact with the teat before drying off: 30 seconds is the minimum recommended time.
Wipe and apply
- Prep-lag time – the interval between manual stimulation and cluster attachment: this should be between 60 and 120 seconds.
Aim for two visits to each cow rather than three.

Reducing the risk of mastitis spread during milking
Contagious mastitis can easily be spread by milking equipment and even by the milkers themselves. Bacteria in milk from infected quarters can spread to other quarters by:
- Splashes and aerosols of milk during stripping
- Milkers’ hands and old pairs of non-disposable gloves
- Teat cup liners
- Cross-flow of milk between teat cups
Clean gloves are cleaner than clean hands, so a new pair of clean disposable gloves should be worn every milking.
A consistent milking routine helps reduce the risk of mastitis spreading. Routines vary between farms, parlour types and different systems, but once cows are in the parlour, the main aim is to put clusters on clean, dry teats. Wash the teats, then wipe them dry with a clean dry cloth or towel. Only use single-use towels to avoid bacteria transferring between cows.
Wash the parlour between rows, and don’t wash while cows are in the parlour unless all the units are attached to cows. Use running water and disinfectant solution to remove infected milk from gloves, liners and other equipment.
A good milking routine
- Wear disposable gloves
- Give pre-milking teat disinfectant enough time to work–at least 30 seconds
- Allow a lag time of 60–120 seconds from manual stimulation to cups on
- Put teat cups on calm cows with clean, dry teats
- Ensure the majority of the teat skin of every teat is completely covered with post-milking teat disinfectant at the end of every milking
Milking routine best practices
- Cows should be calm and clean when they enter the milking area
- Clearly mark cows with clinical mastitis, as well as those treated with antibiotics or with a high SCC
- If the udder is grossly soiled with muck, wash and dry the teats thoroughly
- Pre-dip the teats and give the product enough time to work. To avoid residues, only use licensed disinfectant products and follow the manufacturer’s recommendations. Allow 30 seconds of contact time for the disinfectant to work, and wipe dry with a clean dry cloth or towel
- Attach the cluster unit, ensuring the clusters are squarely attached, aligned and balanced centrally. If you have automatic cluster removers (ACRs), pull the cord, so it is not under tension. Never apply weights to clusters
- Aim for a prep lag time of between 60–120 seconds from the first touch of the cow to application of the cluster
- Foremilk, checking for any signs of mastitis or irregularities in the milk
- Wash and dry hands and gloves during milking if they become dirty or splashed with milk. If cluster units fall off and get dirty, clean in warm disinfectant solution
- If you don’t have ACRs and you’re removing the cluster by hand, pinch off the vacuum and wait a few seconds for the vacuum to drop. Before the cluster falls off, twist the claw to break the seal and remove the cluster
- Never pull off the cluster under vacuum
- Never break the vacuum at the mouthpiece of the liner
- Apply post-milking teat disinfectant, regularly checking that the majority of the teat skin of every teat is completely covered at the end of every milking
- Wash the parlour between rows – don’t wash while cows are in the parlour unless all the units are attached to cows
- Use running water and disinfectant solution to remove infected milk from gloves, liners and other equipment
Useful links
Controlling contagious mastitis
Sectors:

