- Home
- Knowledge library
- Field drainage: Use of mole drains
Field drainage: Use of mole drains
Mole drains are unlined channels that improve natural drainage, particularly in heavy or calcareous clay subsoils. Find out how to use them as part of a field’s drainage system.
When to use mole drains
Mole drains act as closely spaced pipe drains and conduct water to the permanent pipe drains or open ditches.
They are used when it would be uneconomical to install closely spaced pipes for effective drainage.
Soils should have a minimum of 30% clay and maximum of 30% sand content for best results. Such soils hold together better, reducing the risk of channel collapse after the mole is pulled. The soil should also be free of stones at the mole-drain depth.
Mole drains are not suitable for controlling rising groundwater or areas prone to flooding.
How long do mole drains last?
The longevity of mole drains depends on several factors, including:
- Soil texture (high clay content is better)
- Soil calcium content (increased longevity in calcareous soils)
- Climate (wetter conditions reduce longevity)
- Slope (too shallow or too steep reduce longevity)
- The moisture conditions in which the moles were formed
The typical lifespan (in suitable soils) ranges from five to ten years, but it can be reduced where patches of sandier soil occur, as this may lead to premature collapse.
Mole channels in very stable, clay soils (45% clay content) can last over ten years.
Poor soil management can seal off the routes by which water reaches the mole drains.
If the pipe drainage system was designed to be supplemented by mole drains, it is good practice to renew mole drains about every five years.
Installing mole drains
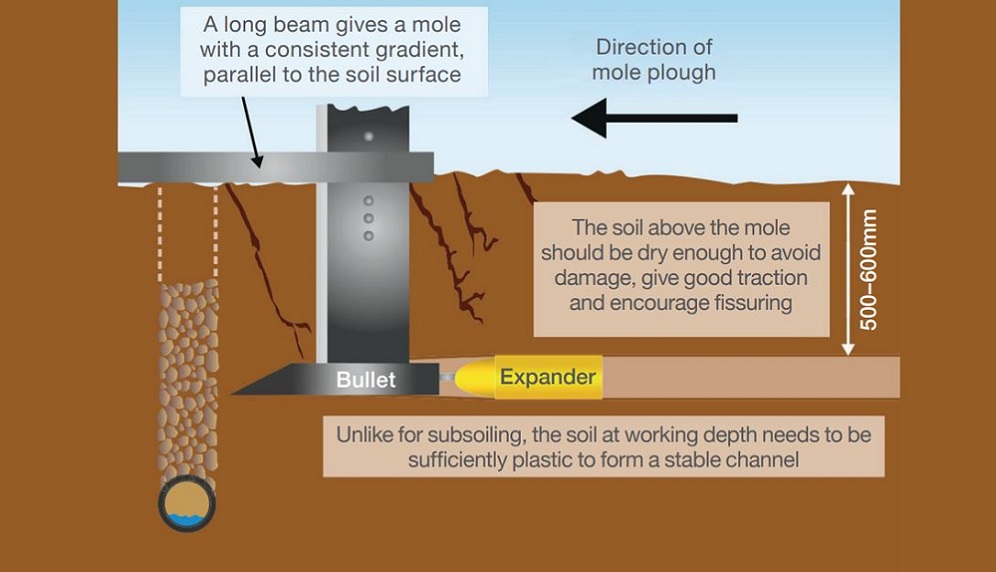
Mole drains are formed by dragging a ‘bullet’ (effectively, a round-nosed cylindrical foot with slight tapering towards the tail), followed by an expander (a cylindrical plug of slightly larger diameter than the bullet) through the soil.
This forms a circular semi-permanent channel. It acts as a ‘natural’ pipe with fissuring in the soil above the channel.
Suitable conditions
Ideally, the soil around the mole channel needs to be sufficiently moist. Too dry, and the channel may crack and break up. Too wet (soft), and parts may slough off and form a slurry.
Undertake moling when:
- The soil at working depth is plastic – it forms a ‘worm’ without cracks when rolled on the hand
- The soil surface is dry enough to ensure good traction and avoid compaction
The drier the soil above moling depth, the greater the fissuring produced and the more efficient the water removal.
These conditions are more common during May to September/October, depending on the season and location.
Note: If large stones are encountered, pull all the moles uphill and pull out after the channel has been disrupted.
Appropriate soil conditions for forming mole drains
 AHDB
AHDB
Find out more about how to determine soil texture
Learn how to assess soil moisture content in the field
Mole spacing and depth
Mole spacing must be close enough to disturb the area between. This is usually 2–3 metres apart, or closer on unstable soils.
Mole channels should be deep enough to be in good clay, avoid damage by cultivations and achieve maximum fissuring.
Optimum mole depth depends on the soil type and the conditions when the moles are installed.
Generally, moles are pulled at 500–600 mm depth.
When first mole draining, the shallower depth is often used due to tractor limitations in tight, compacted soils.
As the soil structure improves, they can often be pulled deeper − although care must be taken not to damage piped drains.
Moles less than 400 mm deep are liable to be damaged by tractors and animals during or immediately after rain and tend to be short-lived.
A rule of thumb is that the expander to mole-draining depth ratio is 1:7. For example, a 70 mm diameter should have a mole depth of 490 mm.
Mole plough setup
- The mole plough should be in good condition, with minimal wear to the ‘bullet’ and tip
- Set up the mole plough so the ‘bullet’ is parallel to the ground surface when at working depth
- A poorly set up mole plough will produce a poor channel and increase the draught requirement
- If the soil is liable to smearing, removal of the expander will reduce channel smearing, increasing the potential for water to enter the mole drain and reducing draught requirements
Mole plough operation
- Moles should be drawn up and down the slope across the lateral drains, making sure that they cross and connect with the permeable backfill over the drains
- It is essential that the ‘bullet’ is drawn through the permeable backfill over the pipe drains
- Pull the plough out as soon as the mole plough has crossed the last drain: blind ends accumulate water
- When moling, dig a pit to expose the channel formed; it should be round and there should be fissuring above it
- Premature collapse of the mole drain in sandier soil can be prevented by positioning drains adjacent to sandier pockets.
Keeping records
Keep a record of where at least one of the most recent mole drains was pulled to allow examination of the mole drains by excavating a profile pit.
This should be done just downslope of a lateral drain and, if still functioning, the mole drain should be reinstated afterwards with a short length of pipe.
Useful links
Topics:
Sectors:
Tags:

