- Home
- Knowledge library
- Action plan for soil testing
Action plan for soil testing
By testing a range of physical, chemical and biological properties of the soil, a good overall picture of how they affect the productivity of the land will be obtained. Over time, baseline information can be used to make management decisions that meet your objectives and help you measure success.
Planning a soil testing strategy
Gather good baseline data on soil health when planning major changes to a production system, e.g. a move to reduced tillage systems, an increased use of composts, green manures and cover crops, reintroduction of livestock or incorporation of crop residues.
- Develop a five-year soil testing action plan for your farm
- Be clear on the reasons for testing soil
- Prioritise fields for soil testing, especially where money and time are limited
- Compare the best-performing field areas with the worst-performing or field margins
- Choose soil physical, chemical and biological tests based on the main priorities and concerns
- Keep good records to track changes in soil health over time
- Collect additional weather data and information on crop yields, quality, health and ease of cultivation
Planning steps
Step 1: Collate relevant information and consider management options.
Step 2: Measure soil health.
Step 3: Change management in response to the potential benefits and costs.
Step 4: Repeat process periodically to maintain or improve soil health.
Frequency of soil assessments
In general, soil health changes relatively slowly, although soil physical condition can be badly damaged in a single cultivation or harvest in wet weather. Plant health monitoring (current and previous crop, weeds) can give early signs of nutrient deficiencies or compaction.
How frequently soil assessments should be conducted varies considerably, and depends not only on the test but also on the value of the crop.
Annual assessments
Physical assessments (such as digging soil pits to look at soil structure and compaction) as well as biological tests (such as earthworm counts) should, ideally, be done annually at the same time of year (usually spring and/or autumn).
Assessments every three to five years
Chemical tests – for pH and major nutrients – should be conducted at least every three to five years (potentially more often in light soils producing high-value crops).
Assessments five years +
Soil organic matter changes relatively slowly. There is little point in conducting tests for soil organic matter more often than once every five years, potentially only every 10 years, unless significant amounts of organic materials have been applied annually.
Soil sampling strategy
All assessments require a robust soil sampling strategy. Take samples at least once per crop rotation and at the same time point in the rotation. This maximises comparability between samples.
Ideally, divide fields into similar (relatively uniform) zones. To identify zones, note soil and crop variations when cultivating, field walking, spraying and fertilising, combining (especially if yield mapping) and soil scanning (e.g. conductivity).
Take representative samples from each zone.
Soil health scorecard
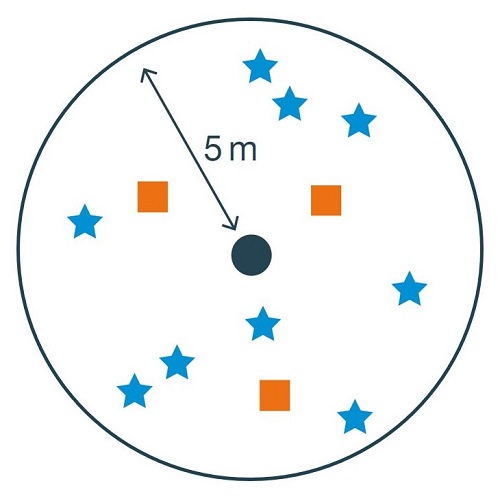
For the soil health scorecard, the guidance is to record a centre point for the assessment area and to take samples up to 5m away from it (at random points).
For VESS and earthworms, take three samples (illustrated by the orange squares).
For other indicators, take several samples (illustrated by the blue stars).
What is the soil health scorecard?
Effective record-keeping
Keep good records, to track changes in soil health over time. Ideally, a file for each field should be kept. Laboratory results, notes on soil profile, and soil structure assessments and yield figures are important. Additional information, such as comments on weather, soil conditions and ease of cultivation, is also worth keeping on record.
Get more detail on a range of tests and indicators of soil health
Find out how soil mapping can help identify soil management zones
 AHDB
AHDB
Topics:
Sectors:
Tags:

